
Delegate, delegate, delegate. How often do we apply the suggestion to delegate? However, in Rotary clubs delegation is a great way to create leadership opportunities and share the workload. If you’re responsible for the public image of your club, especially the website, you’re confronted with the challenge of constantly needing fresh images. And you cannot always be in two places at once to grab that “People in Action” moment. So…DELEGATE to that member or members who show interest in snagging those moments for you. But instead of forwarding images to you via email, empower them to upload directly into your Easy and Beautiful v6 website configuration. Here is the process to enable your member to upload photos into an image gallery that you can then position on your website.
First, add the individual with the photos to your security access list. He or she must already be a level 3 or 4 for you to be able to include them.
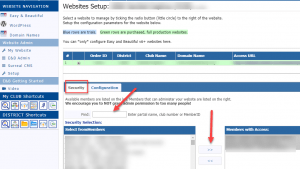
- Open Websites and click on Setup

2. On the Security tab, use the Find box to search for the individual; enter part of their last name.
3. With the arrow keys push the photographer’s name from the left to the right side.
Now the photographer will be able to log into DACdb, select the Website icon (if it’s not on his/her My Club screen, use the cogwheel on the right to slide it from Available Icons into the Icons Displayed group), and click on E&B Admin in the left navigation to open the website configuration. The photographer will enter his/her regular DACdb login credentials.
There are step-by-step instructions in Help to guide you both through the rest of the process:
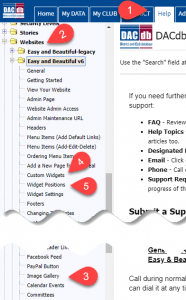
- Click on the Help tab
- Scroll down and select the Websites folder and then the Easy and Beautiful v6 folder
- The photographer can follow the steps in the Image Gallery article to create and upload photos into galleries. If you choose, this can be the extent of his/her duties.
- Next use the instructions in the Custom Widgets article to name the widget and insert the gallery identifying number into the widget.
- Follow the steps in Widget Positions guide to place the custom widget with the gallery in one of your website side bars.
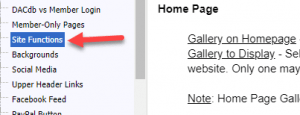
If at some point during the year you want to use one of the galleries at the top of the website center column, first go into Widget Positions in the website configuration and make sure that gallery is not in use in one of the side bars. If in use, slide it back to the center Unused Widget list. Now you can open Site Functions in the website configuration and locate the Home Page section. Turn “Gallery on Homepage” to yes, and then insert the gallery ID number in the Gallery To Display field. Be sure to Submit to apply the change. In Help, you can reference Websites>Easy and Beautiful v6>Site Functions for this part of the procedure:
Whew! With that little bit of effort, you’ve shared the tasks of keeping your club’s public image fresh through delegating duties. Bravo! If you or the photographer need further assistance, please contact us at [email protected]